Developers localizing Android apps have to contend with the same considerations and issues as with software on any other platform. This article is not a step by step guide to the internationalization process, but simply touches on a couple of Android specific tips and tricks for developing a localized version of your app. Before proceeding you should be familiar with the Android Localization practices described in the official documentation. Localizing with Resources and Localization Checklist are the best place to start.
What is Pseudo-localization?
Pseudo-localization is a method to test the internationalization of text while maintaining readability. The purpose of this testing is to expose issues regarding length and flow of text, layout issues and logic issues.
If you are getting translations done externally it can be a time consuming and expensive process so localization testing should take place long before you get any kind of translator involved. By verifying everything is correct you will save time and iterations back and forth with translators.
Testing with Pseudo-localization on Android
You can test localization in your Android app by using a special developer locale that will lengthen string lengths and add accents to characters while still maintaining readability of the original strings. While documentation from Android regarding these new locales is basically non-existent at the moment, it appears you need to be running Android 5.0+ and have developer options enabled on the device to be able to access these special locales.
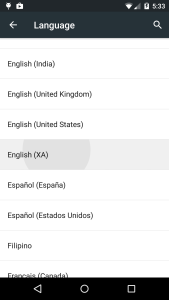
On your compatible Android device navigate to the device settings and select Language & Input > Language > English (XA)
After setting the language to English (XA) (above left image) text will start to appear in the pseudo-localization style (above right image). You will notice how the text is still legible in English, while being substantially longer than normal, in order to simulate more verbose languages.
As a broad generalization the Romance languages can be up to 30% longer than the equivalent English, while languages such as Chinese, Japanese and Hebrew languages may be significantly shorter.
Using your Android device after making this locale change you will note that most apps will not take on the same English (XA) appearance as is displayed in the example image. The reason for this is that pseudo locale support is designed simply for testing so must be explicitly enabled for each app individually in the build process. You can do this by setting pseudoLocalesEnabled to true in your gradle build script.
buildTypes {
    debug {
        pseudoLocalesEnabled true
    }
}
Note: Support for pseudoLocalesEnabled was added to the Gradle plugin version 0.14.2.
Simplifying localization using XLIFF
XLIFF is a set of standards to aid in the translations of XML documents. You can use XLIFF to prevent text being translated and also to show formatted examples of string paramters. To use XLIFF in your Android string XML files you need to include the XLIFF 1.2 namespace:
<resourcesxmlns:xliff="urn:oasis:names:tc:xliff:document:1.2">
This example shows how you can use XLIFF to help translators by flagging text not to be translated:
<stringname="website_url">Take a look at our website <xliff:gid="blog_address">https://androidbycode.wordpress.com</xliff:g></string>
This example shows how to use XLIFF to display example arguments when using String formatting. It allows translators to understand what the data that will be injected into the string will look like.
<stringname="city_longitude">Longitude: <xliff:gid="lon"example="37.8° S>%1$s</xliff:g></string>
Note: Support for XLIFF is available in Android Studio 0.3 and later
Supporting Right to Left layouts
Native Android support for right to left layouts (RTL) was introduced in API 17 (Android Jelly Bean 4.2). The Android Framework Team covered the introduction of this support in some detail.
Layout Mirroring is a term used to describe the ability of software to reorder the UI elements to match the right to left flow for that locale. It is possible to achieve a mirrored layout by manually creating a layout for RTL locales, but with API 17 automatic layout mirroring was introduced. If you want your app to use layout mirroring then you need to flag this support in the <application> element in your manifest file.
android:supportsRtl="true"
For some time Android Lint has been generating warnings in layouts to replace or duplicate left/right layout properties to new start/end equivalent properties for RTL support. For example if your layout contains layout alignments for left or right, such as:
android:layout_alignParentRight="true"
You should also add the equivalent End element to support RTL:
android:layout_alignParentEnd="true"
The latest versions of the Android Studio layout editor will add these in automatically when you create the items. If you are hand coding the XML or created the layout in an alternative IDE you may have to add them manually.
Mirroring drawables on RTL layouts
Drawables often need to be reversed on locales that use RTL layouts. An example of this is the Notification bar at the top of your Android device. On a RTL layout the icons, ie. signal strength, will be reversed. There are a couple of ways to achieve this.
For API 19+ you can set the the AutoMirrored Flag to indicate if a drawable should automatically be reversed when a RTL locale is selected.
For API 17+ you can specify different drawables in the same manner as you might for different densities using the qualifier “-ldrtl” or “-ldltr”. For example your resource folders may look like this:
res/
    drawable-ldrtl-xhdpi
    drawable-ldltr-xhdpi
Testing with Pseudo-localization on RTL layouts
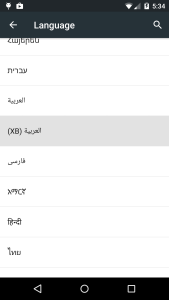
Earlier in this article I explained how to set your device to language English (XA). There is also another locale (XB) in the languages list which allows testing of pseudo-localization using a mirrored RTL layout.
In the images above the Android signal strength icon is AutoMirrored once the RTL layout locale is invoked. Take some time to consider which icons should be mirrored in your app. Also note how layout mirroring has been invoked with the ActionBar to move the search and navigation views.
Summary
Translating large products is a time consuming and expensive exercise that will require at least a few iterations between developer and technical writer. By ensuring your product is fully prepared for localization prior to starting the text translations you will keep the number of iterations and costs of the process down. Add pseudo-localization, visually inspect all layouts and run your full test process to ensure your product not only functions, but looks good in anyone’s language!


Reblogged this on Dinesh Ram Kali..
LikeLike
Thanks for your efforts. Helped me a lot.
LikeLike